| This place page is currently being rewritten as part of the Morrowind Overhaul Project. The page is being rewritten and checked in several stages. All users are welcome to make changes to the page. If you make a change that is relevant to the project, please update this template accordingly, and make sure you have observed the project guidelines. Detail
|
|
||
|---|---|---|
| # of Zones | 6 | |
| Occupants | ||
| Bandits, Dwemer Centurions | ||
| Console Location Code(s) | ||
| Arkngthand | ||
| Region | ||
| Molag Amur, [0,-2] | ||
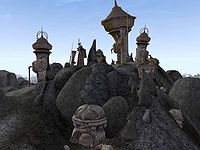
Arkngthand is a large ruin near the top of a mountain located in the Molag Amur region, near Moonmoth Legion Fort.
It is most likely the first Dwemer ruin you will encounter in the game. You are sent to Arkngthand as part of the Antabolis Informant quest (part of the Main Quest). The infamous Dwemer puzzle box is hidden here, guarded by 12 bandits.
East from Balmora and up the hill on the north side of Fort Moonmoth, a bridge spans the Foyada Mamaea. The entrance to Arkngthand can be found by turning slightly to the right on the east side of this bridge.
Arkngthand is divided into six different areas: Cells of Hollow Hand, Deep Ore Passage, Hall of Centrifuge, Heaven's Gallery, Land's Blood Gallery, and Weepingbell Hall. Bandits have made their hide-out in the outer chambers, and various Dwemer creatures prowl the inner regions.
- Hall of Centrifuge
- The main entry to Arkngthand. It is a large open cavern with Dwemer architecture embedded throughout. The entry from the outside is atop this cavern and entrances to Cells of Hollow Hand and Weepingbell Hall are near the bottom. A Dwemer spear and various Dwemer artifacts can be found here, along with a motley assortment of ingredients, random Dwemer items, gold, and other common items which are held in steel kegs, a cabinet, and two crates.
- Cells of Hollow Hand
- The Cells of Hollow Hand are two small chambers each accessible only through the Hall of Centrifuge. One cell contains the skill book A Dance in Fire, Chapter 4 and the other contains the Dwemer puzzle box needed for a quest. Additional Dwemer artifacts are scattered throughout the Cells, and steel kegs and crates contain ingredients, gold, and more artifacts.
- Weepingbell Hall
- Weepingbell Hall is mainly a system of corridors connecting The Hall of Centrifuge with Heaven's Gallery. There is also one small room, and two caved-in passages which suggest the presence of more chambers that are closed off. Dwemer artifacts and two crates holding random Dwemer items and gold comprise the available loot.
- Heaven's Gallery
- Heaven's Gallery is a large segment with three rooms and an underground causeway leading to a telescope dome. There are corridors that lead back to Weepingbell Hall and forward to Land's Blood Gallery. Crates and steel kegs (most of which are empty) hide gold and ingredients, and an Ornate Dwemer Chest contains 25 gold and a few random Dwemer items. There is a Dwemer tube and a Dwemer coherer hidden on the upper ledge surrounding the telescope dome. The key to the lower levels of Arkngthand is given to you if you choose to return to Hasphat Antabolis after delivering the Sixth House notes to Caius Cosades. This key simply opens the locked door into Land's Blood Gallery if your lockpick skill is lacking.
- Land's Blood Gallery
- Connects Heaven's Gallery to the Deep Ore Passage. Eight Dwemer enemies patrol this area. One chest contains random Dwemer armor and a key to unlock doors in the Nchurdamz ruins. Another chest and a closet contain random Dwemer loot.
- Deep Ore Passage
- This is the deepest part of Arkngthand. There are seven Dwemer enemies here. Two dwarven chests and two barrels contain the usual random Dwemer loot. One chest, in an upper tier of the structure in the last room, requires levitation to reach, while the other, in the rocky passage on your left near the entrance, can be reached by "running and jumping" up the incline just inside the doorway or, more easily, by levitation.
People
| Name | Race | Class | Level | Health | Magicka | Alarm | Fight | Location | Notes | |
|---|---|---|---|---|---|---|---|---|---|---|
| Bato Veranius | {{ }} | [[Morrowind:|{{{race}}}]] | [[Morrowind:|{{{class}}}]] | Heaven's Gallery | ||||||
| Boss Crito | Male | Imperial | Battlemage | 5 | 70 | 118 | 30 | 90 | Cells of Hollow Hand | Has a few potions, as well as a scroll of Ondusi's Unhinging |
| Coirtene Liore | {{ }} | [[Morrowind:|{{{race}}}]] | [[Morrowind:|{{{class}}}]] | Heaven's Gallery | ||||||
| Cristus Lync | {{ }} | [[Morrowind:|{{{race}}}]] | [[Morrowind:|{{{class}}}]] | Hall of Centrifuge | ||||||
| Dathman Mochtuis | {{ }} | [[Morrowind:|{{{race}}}]] | [[Morrowind:|{{{class}}}]] | Weepingbell Hall | ||||||
| Frink Ruuz | Male | Redguard | Smuggler | 3 | 63 | 64 | 0 | 90 | Hall of Centrifuge | |
| Idhdean Tailas | {{ }} | [[Morrowind:|{{{race}}}]] | [[Morrowind:|{{{class}}}]] | Cells of Hollow Hand | ||||||
| Irbran Kirbatha | {{ }} | [[Morrowind:|{{{race}}}]] | [[Morrowind:|{{{class}}}]] | Heaven's Gallery | ||||||
| Lalaine Essagan | {{ }} | [[Morrowind:|{{{race}}}]] | [[Morrowind:|{{{class}}}]] | Weepingbell Hall | ||||||
| Red Livia | {{ }} | [[Morrowind:|{{{race}}}]] | [[Morrowind:|{{{class}}}]] | Weepingbell Hall | ||||||
| Snowy Granius | Male | Imperial | Battlemage | 3 | 54 | 108 | 30 | 90 | Outside | |
| Surus Velvus | Male | Imperial | Smuggler | 3 | 53 | 84 | 0 | 90 | Hall of Centrifuge |
Related Quests
Main Quest
- Antabolis Informant: Trade an ancient artifact for an expert's insight.
