|
||
|---|---|---|
| # of Zones | 3 | |
| Occupants | ||
| Corrupted Shades, Malkoran | ||
| Important Treasure | ||
| Dawnbreaker Battle of Red Mountain |
||
| Console Location Code(s) | ||
| KilkreathRuins01, KilkreathRuins02, KilkreathRuins03, KilkreathRuinsExterior01, KilkreathRuinsExterior02, KilkreathRuinsExterior03, KilkreathRuinsExterior04, KilkreathRuinsExterior05 | ||
| Region | ||
| Haafingar | ||
| Location | ||
| West-southwest of Solitude | ||

Kilkreath Ruins is a temple dedicated to Meridia, situated below the Statue to Meridia, that is only used for the quest The Break of Dawn. This is the only place in Skyrim that you can encounter corrupted shades. The ruins are unique as you need to activate many pedestals, which redirect a beam of light, to progress through the ruins.
Until you have retrieved Meridia's Beacon, you are unable to enter the ruins, due to all the doors being locked and requiring a key to enter.
Related Quests
- The Break of Dawn: Find Meridia's Beacon and use its light to cleanse her temple of undead.
Walkthrough
Exterior

Outside is the Statue to Meridia which, by activating the gem pedestal, will send you on a Daedric quest to find Meridia's Beacon. Once it has been recovered, Meridia will unlock the doors in order for you to enter and cleanse it of Malkoran and the corrupted shades he has created from those that have died in the civil war. She sends down a beam of light which you will need to guide through the ruins in order to open the doors along the route to the Kilkreath Catacombs, where you will encounter Malkoran. The entrance is to the right and downhill of the statue. Uphill north-northeast of the statue is a word wall which teaches a word of the Elemental Fury dragon shout. Leading up to the entrance to the ruins are obelisks with refracting gems sitting atop them, which are used in the quest The Break of Dawn.
Kilkreath Temple
The entrance leads into a wide passage with stairs down to the south. There is a black smoke-like atmosphere and the desecrated corpses of the corrupted shades found throughout the ruins. These can be looted for large amounts of gold (see notes). There are also a large number of both urns and burial urns within the ruins. At the bottom of the stairs, behind some fallen masonry is a patch of Namira's Rot fungus. The passage is staggered to the left by a statue with three burial urns beside it. Further along, on the left, is an adept-locked door which opens a short passage with a lever at the end. On the right of the main passage is a doorway blocked by a lowered metal gate, which is raised by the lever. These give access to another short passage and an unlocked chest and an ancient Nord sword lying next to it.
Beyond these the passage turns to the east, and then splits; both directions lead down into the same chamber with large arches and stone pillars supporting the ceiling high above. In the center is a refracting gem on top of a pedestal with light streaming into it through a hole in the roof. To the right of the pedestal, next to a statue that has been knocked over by falling masonry, is an iron shield. There are large double doors at the far end. You will need to activate each of the pedestals as you continue through the different areas in order to open the doors and continue towards the Catacombs. Beyond the doors is a long flight of stairs down to another opened set of doors with a white cap fungus in front. Through the doors you will see two corrupted shades, which appear as little more than a black smokey outline in their original armor. A third shade will join the fight once battle has commenced. When the shades are killed they leave behind their weapons and form faintly black puddles, similar to those formed by ice wraiths.
Through the doors is a large room with rows of stone benches facing towards another pedestal with a refracted gem on top on the first of three rising levels. There is a door down a short passage to the south. The pedestal is on the first level. On the second level is a set of shelves holding a candlestick and many ruined books and a sideboard with a random empty soul gem on top. The final level has large urns at either end and double doors in the middle. Both doors will only open when you activate the pedestal. From here it is possible to jump on top of the shelves and reach a ledge in front of a barricaded room containing several burned books, a leveled invisibility potion and damage health poison, which are out of reach and require the use of telekinesis. Alternatively they can be dislodged with arrows or spells until they roll close to the ledge. Behind the double doors there has been a cave-in, with a small gap that the beam of light can shine through, but you will need an alternative route. The door to the south opens to a room that contains two corrupted shades, several large urns, several windows on the left into the room behind the cave-in and a set of shelves on the left. There is also a wooden door at the end of the room.
This opens to a passage that takes a couple of turns and descend a flight of stairs before another door to another room containing two desecrated corpses, a sideboard holding a random potion of healing and an unlocked chest. There is a passage heading east into another large room with balconies on three sides and wooden stairs leading up to the south and east. There are two corrupted shades in this room, one on the lower level and an archer on the balcony to the north. There is one desecrated corpse on the lower level. The balcony to the east links with the one to the north. There is also a bridge linking the northern balcony to a central platform with a refracted gem on a pedestal in the middle and a second span to the southern balcony that has collapsed, although the gap can be jumped. At the rear of the northern balcony is an arcane enchanter, with a lowered gate and an expert-locked iron door to the right. Behind the door is a lever that raises the gate and behind the gate an unlocked chest. Once you activate the pedestal an iron door on the southern balcony will be opened. Behind this is a short passage containing another desecrated corpse and another iron door that leads outside on a balcony.
Kilkreath Balcony
The balcony is high on the mountainside far above the road from Solitude to Dragon Bridge, with a view of the Karth River as it winds its way towards Solitude from Markarth in the southwest and also Eldersblood Peak to the southeast. There is a narrow walkway on your left with an expert-locked chest and stairs leading up to another iron door on the far side. There are seven refracting gems on tall statues linking the light from the Kilkreath Temple to Kilkreath Ruins. It is possible to climb down onto the balcony without entering the rest of the ruins.
Kilkreath Ruins

Through the iron door on the balcony is a passage heading north and a flight of stairs leading up with a couple of turns before leading into a large room guarded by three corrupted shades on the ground level and one on a caged walkway above. In the southwestern corner is a table with a desecrated corpse on top and a broken stone table beside with three loose septims, a gold emerald ring and a burial urn on top the half of the table still standing. There is an iron door in the middle of the south wall that requires you to activate a gem in order to gain access. There are wooden stairs leading up to a balcony to the east where there are two sideboards flanking an iron door. One of these holds a random potion of magicka and a random potion of resist magic. There is also a short walkway out onto a platform with a refracted gem on a pedestal. Activating this opens the door on the balcony.
There is a passage behind the door that leads to a room guarded by one corrupted shade. There is a passage to the north, with an unlocked chest to the left of it and to the right a leveled trap connected to a wooden door that triggers a spear trap from the floor, with a desecrated corpse leaning against it. This opens into a room containing an unlocked chest, a set of shelves holding a candlestick, a random pair of boots, a random potion of magicka and a random potion. Opposite this is a sideboard with an unlocked, possibly empty strongbox on top. The passage turns to the west, where you will find a tripwire that triggers a swinging blades trap in the passage beyond. At the far end is a lever that deactivates it. From here the passage leads out onto the caged walkway which passes over and around two platforms to a third platform that isn't caged with a narrow walkway crossing to the north and a small area, with a broken span to the west with a locked door ahead. Activate the pedestal on the left on a separate platform to open the door ahead. Then either cross to the north which continues around to the west or jump the gap. In the northwestern corner is a stone table with a desecrated corpse on top, a novice-locked chest between two sets of shelves holding an iron helmet and gauntlets, two random potions of stamina, a random potion of healing and a copy of the Block skill book Battle of Red Mountain.
Through the door, the passage leads to another large room guarded by two more corrupted shades. There are four desecrated corpses on the ground level and two flights of wooden stairs leading up to two of four raised sections around the room. The other two areas are blocked by wooden walls. The stairs on the west wall lead up to a small area with a random potion of strength on a plinth with a weight sensitive plate that triggers a single spear from the wall behind. From the top of the other stairs against the east wall you can jump to a wooden ledge on the north wall where there is another desecrated corpse. To the east is a doorway to a wide passage which turns after a few paces before leading back out onto a platform high above the large room with the caged walkway beneath you. On the platform is another refracted gem on a pedestal and another desecrated corpse. Activating this pedestal opens the door on the ground level far below you, you can either backtrack or jump down out the top of the cage and from there to a platform and then the ground. Through the open door is a short flight of stairs leading to an iron door that leads to Kilkreath Catacombs.
Kilkreath Catacombs
Through the door is a wide passage that descends a flight of stairs and after a couple of turns leads into a large room with a final refracting gem on top of a pedestal on a raised section in the middle of the room. There are three desecrated corpses here, one of which is leaning against the raised section and has an iron dagger and three loose septims beside it. In the northeastern corner on a small raised section is a random potion of healing, while in the southeast corner on a similar raised section is a random potion of stamina and an unlocked chest. Activating the pedestal opens double wooden doors to the east that lead to a large room where an extremely powerful necromancer, Malkoran, waits with several corrupted shades. On your immediate left, on a slightly raised section is a random potion of magicka, while on the right and following the wall around to a broken table, there is a leveled paralysis poison, easily obtained since nothing is looking towards the door, which can be quite helpful. After Malkoran and his shade have been killed, the one-handed sword and Daedric artifact, Dawnbreaker, will appear in the pedestal where the light from the refracted gems terminates. There are at least eighteen desecrated corpses around the room and a random potion on a stone table to the northwest. Upon taking Dawnbreaker you will be transported high in the sky to commune with Meridia again. Afterwards you will be lowered to the ground in front of the statue.
Notes
- There are 43 desecrated corpses throughout this ruin that contain large amounts of gold. If you loot them all, you can get an amount of gold in the range of 1075-5375.
Maps
-
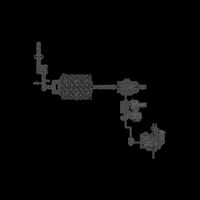
A map of Kilkreath Temple
-
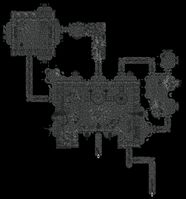
A map of Kilkreath Ruins
-
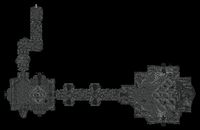
A map of Kilkreath Catacombs


